Thursday, September 13, 2012

Sea Shell Collection - Trash to Treasure

Original Artwork
 This project started out as a way to display my seashell collection. I collected sea shells on many of my favorite childhood vacations and I was tired of having them sit in a box. 
Everything I used was laying around the house or left over from other projects. Someone gave us a broken dresser, so I painted the front of the drawers blue and used them as a base for my creation. I hot glued the shells on along with some other treasures. I attached the boards to another piece of wood covered in fabric. (warning - all of the wood makes it very heavy). I made some clouds out of cotton balls.
Then I made the quote to go with it using foam board, scrapbook paper and more fabric.
  
I hot glued pop tabs (actually V8 tabs) and pipe cleaner to hang up the foam board. 
Super cheap!
 I decided I needed a sand castle to go with my sea shells so I hot glued some sand onto foam board. I'm sure there's a better way to attach sand... (I wouldn't recommend the hot glue...)
There's a YW medallion on my castle and a Return with Honor charm. A geode is the door.
There's a chain-mail flower from my little brother and an itty bitty box from my stocking one year.


 There are a few coins from foreign countries, flattened pennies, and a shrinky dink kimono pin I made in elementary school among other random treasures I could never use.

Thursday, May 3, 2012

Homemade pasta

I let myself go to Goodwill and I found an Imperia pasta machine for $5! Except I found out it was missing the handle. I did not feel like paying $16 for a replacement handle online so Prince Charming crafted this wonderful handle out of a hanger! I was so impressed. It got the job done, but someday I think I'm going to need something a little more solid.

 I served this pasta with cilantro pesto and some garlic mushrooms. Yum! Prince Charming thinks it's amazing too.


Whole Wheat Pasta Recipe:
3 cups flour
4 eggs
1/2 tsp salt
2 tsp oil
Water as needed

Mix the dough. Mine was too solid to actually be mixed the bread hook on the Bosch, so I just finished it by hand - it felt like a brick. The dough should not be sticky or else it will get stuck in the machine.
Then let the dough rest for 30 minutes.
Then I got to try our my machine! I rolled it on the widest setting first and then on a thin setting and then through the noodle slicer. It was a little tricky handling long sections of dough. I'm sure I'll figure out a better technique in the future.
Let the pasta air dry for at least 15 minutes to avoid clumping. I separated out the noodles, but I don't know how necessary that was. It seemed logical. I kind of wanted a pasta drying rack so that I could hang up all of my noodles. 
Bring a pot of salted water to a boil. These fresh noodles only needed to cook for 3 minutes. I did it in a few smaller batches so that it wouldn't be too crowded. 
Probably makes 8-10 servings...

I also made some giant lasagna type noodles for tomorrow night because I did not have room to lay out any more cut noodles. Maybe I'll even use them to do a lasagna roll...
I made the curly pasta by wrapping it around a skewer and letting it dry for a while in that shape.So fun! It would make a great gift to give someone a bunch of dried homemade curly noodle sticks - and they would make a pretty decoration. I'll have to see how well homemade pasta dries.
I just had a really great idea I'm going to try sometime: make letters out of the pasta! maybe even write your name in cursive! It would be fun for kids- assuming it works.

Wednesday, April 11, 2012

Mirror, Mirror, On the wall

Mirrors are a fun way to decorate!


 It all started when I found a bunch of  square 12" mirrors at Goodwill really cheap and a pack of 1" mirrors at Joanns for a couple more bucks. I was trying to figure out what to do with them and this pretty design ended up on my wall. (Recently I put a picture of Christ in the center of the big swirl.) I attached the to the wall with some foam tape - a little square in each corner - and they have been securely attached to the wall for over two years. Hooray for foam tape!


Pretty as these mirrors are, they are not exactly the right height for my face... so I usually just catch glimpses of the top of my head or shoulder or belt buckle... It's a matter of opinion whether that is a good or bad thing though.


I found some more mirrors later and tried out a different pattern in the stair well in combination with some painted paper plate centers (cut out for some cub scout activity earlier).

 I made the picture larger so you might be able to see some of the fun designs painted on the circles. I think I was going for something cheerful and fun to combat the rainy days.

 These last mirrors are a reminder of the Japanese exchange student we hosted for a couple of weeks. She and her friend made a special Japanese dinner for us. Afterwards the other host mom got out some foam board for us to make a collage about ourselves and our goals. She called the project something really cool and mysterious - which I of course forgot. Then when the collage was finished we glued the foam board onto the mirror with some really smelly glue - probably rubber cement (be sure not to get any on the mirror that will be showing through!) I really love how they all turned out! It was so nice of her to involve us in this fun project and let us use her materials.


Prince Charming got to make one too. His cut out shape is a kite and there is even a string coming off the end. The kite is floating up among the clouds along with a race car, a private jet, and a mansion... Pretty accurate actually - those dreams may be up in the clouds for a long time.


 And I bought some fun star shaped mirrors for a night time scene in the bedroom - in progress...

Saturday, March 31, 2012

Flower Spider

I was weeding my flower bed and  noticed this:
 Besides the daffodil being huge... Umm... that spider is just walking around with a huge fly! How did it catch it and get it to hold still?

This beautiful spider is called a goldenrod crab spider or sometimes a flower spider. (scientific name: Misumena vatia)
According to the University of Michigan Museum of Zoology crab spiders can change color (white or yellow) depending on the flowers they hang around. Instead of making webs they ambush their prey when the insect lands on the flower. Their venom paralyzes the prey and the spider just holds onto to it until it is done eating (don't worry they can't hurt humans). Also, as their name suggests they are able to walk sideways like a crab. How cool!

Thursday, March 29, 2012

Alter a Pocket to Make it Longer

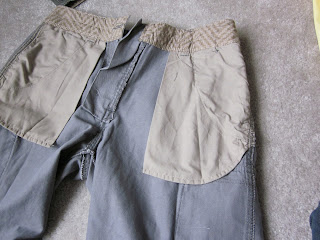
Prince Charming needed some new shorts. All 5 pairs were stained by mud and paint and getting holes (because he wears them rain or shine or snow, rides his bike to work and does many home improvement projects in them). However the prince doesn't like to go shopping and is kind of picky. His friend (who wears exactly the same kind of clothes) told us about a good deal so we just bought the shorts - one in each color. However, the picky prince thought the pockets weren't long enough to keep his precious phone from falling out. Not wanting to hunt for a better deal or more acceptable shorts I opted to lengthen the pockets myself. This is how I did it:

First, make a pattern. Figure out how much length needs to be added and extend the shape of the pocket. Add seam allowances to the pattern. (It's better to err on the side of too much extra pocket because it will be much easier to make it smaller if it needs adjusting).


"Before" - This is what you start with


Line up your paper pattern with the pocket and mark the line

Be brave and cut off the bottom of the pocket. If you can, leave at least an inch or two of old pocket seam - it will make sewing much easier.

Pin the pattern to the fabric with one side along the fold and cut. (I just used some spare cotton fabric. I figured the color didn't matter but now I really like the yellow - he has "Pockets Full of Sunshine")

This is what it should look like after you cut it out. Notice the long top side and the short bottom side.

Here's the tricky part. Put the pocket extender inside of the pocket. Line up the long side with the cut edge of the pocket. The future bottom of the pocket should be deep inside and closer to the waist line right now.

Start pinning together in the middle at the fold of the pocket. If the fabric is not lining up because of different angles just make a small straight cut only as long as your seam allowance. This with allow the fabric to spread out at the right places so you get a flat seam.

It should look like this when you are done pinning.

Start sewing at one edge of the pocket using the seam allowance you chose. Notice how the pins are perpendicular to the seam - this makes them easier to pull out as you sew.

Rotate the shorts around as you get to the other side of the pocket to relieve the tension and get a good angle for sewing. Don't worry if it occasionally looks like a bunched up mess - as long as the part you are sewing is flat and lined up everything is golden.

Now use a serger on that same seam  to get a nice edge and prevent fraying.

Ta Da! This is what it should look like when you unfold it.

This part it fun and easy- Serge (or sew first if you are unsure) the out side edge of the pocket. Go ahead and serge onto the remaining piece of pocket (without cutting it) to complete the seam nicely.

"After" - Nice deep pockets. (They were too deep so I just used the serger really quick to take off an inch.)

The inside of the pocket has the nice hidden seam so it feels nice.


The prince loves his new pockets!