Thursday, March 29, 2012

Alter a Pocket to Make it Longer

Prince Charming needed some new shorts. All 5 pairs were stained by mud and paint and getting holes (because he wears them rain or shine or snow, rides his bike to work and does many home improvement projects in them). However the prince doesn't like to go shopping and is kind of picky. His friend (who wears exactly the same kind of clothes) told us about a good deal so we just bought the shorts - one in each color. However, the picky prince thought the pockets weren't long enough to keep his precious phone from falling out. Not wanting to hunt for a better deal or more acceptable shorts I opted to lengthen the pockets myself. This is how I did it:

First, make a pattern. Figure out how much length needs to be added and extend the shape of the pocket. Add seam allowances to the pattern. (It's better to err on the side of too much extra pocket because it will be much easier to make it smaller if it needs adjusting).
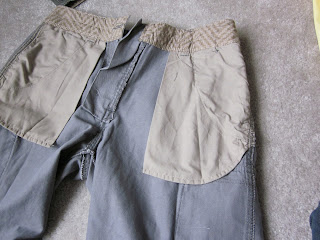

"Before" - This is what you start with


Line up your paper pattern with the pocket and mark the line

Be brave and cut off the bottom of the pocket. If you can, leave at least an inch or two of old pocket seam - it will make sewing much easier.

Pin the pattern to the fabric with one side along the fold and cut. (I just used some spare cotton fabric. I figured the color didn't matter but now I really like the yellow - he has "Pockets Full of Sunshine")

This is what it should look like after you cut it out. Notice the long top side and the short bottom side.

Here's the tricky part. Put the pocket extender inside of the pocket. Line up the long side with the cut edge of the pocket. The future bottom of the pocket should be deep inside and closer to the waist line right now.

Start pinning together in the middle at the fold of the pocket. If the fabric is not lining up because of different angles just make a small straight cut only as long as your seam allowance. This with allow the fabric to spread out at the right places so you get a flat seam.

It should look like this when you are done pinning.

Start sewing at one edge of the pocket using the seam allowance you chose. Notice how the pins are perpendicular to the seam - this makes them easier to pull out as you sew.

Rotate the shorts around as you get to the other side of the pocket to relieve the tension and get a good angle for sewing. Don't worry if it occasionally looks like a bunched up mess - as long as the part you are sewing is flat and lined up everything is golden.

Now use a serger on that same seam  to get a nice edge and prevent fraying.

Ta Da! This is what it should look like when you unfold it.

This part it fun and easy- Serge (or sew first if you are unsure) the out side edge of the pocket. Go ahead and serge onto the remaining piece of pocket (without cutting it) to complete the seam nicely.

"After" - Nice deep pockets. (They were too deep so I just used the serger really quick to take off an inch.)

The inside of the pocket has the nice hidden seam so it feels nice.


The prince loves his new pockets!

No comments:

Post a Comment